webpack 性能优化
TS、Eslint、webpack 性能优化
基础内容
打包 TS 文件
使用 ts-loader
npm i ts-loader typescript -D
项目目录如下:
ts-test
 ├── dist
 │   └── main.js
 ├── package.json
 ├── src
 │   └── index.tsx
 ├── tsconfig.json
 └── webpack.config.js
tsconfig.json为 TS 的配置文件,更多配置查看
index.tsx
interface person {
  name: string;
  ts?: boolean;
}
function Recruit(personObj: person): string {
  if (personObj.ts) {
    return `congratulations!${personObj.name}`;
  } else {
    return `sorry,${personObj.name}, we need a employee who know ts!`;
  }
}
let person1 = { name: 'Alan', age: 21, ts: true };
console.log(Recruit(person1));
let person2 = { name: 'Bob', age: 21 };
console.log(Recruit(person2));
tsconfig.json
{
  "compilerOptions": {
    "outDir": "./dist/", // 由于webpack中配置了,这里可配可不配
    "module": "es6",
    "target": "es5",
    "allowJs": true
  }
}
webpack.config.js
const path = require('path');

module.exports = {
  mode: 'production',
  entry: './src/index.tsx',
  module: {
    rules: [
      {
        test: /\.tsx?$/,
        exclude: /node_modules/,
        use: 'ts-loader'
      }
    ]
  },
  output: {
    filename: '[name].js',
    path: path.resolve(__dirname, 'dist')
  }
};
当我们项目安装了三方库时并且要在 ts 文件中使用,得安装该三方库的definitions ,具体库可以在TypeSearch查找
devServer.historyApiFallback
开发环境下使用单页应用需要配置devServer.historyApiFallback: true
Eslint
Eslint 是用来统一代码风格的,在团队协作时能够保证每个人书写出的代码风格都是统一的,有利于代码的维护。
使用方式:
npm i eslint -D
初始化配置
npx eslint --init
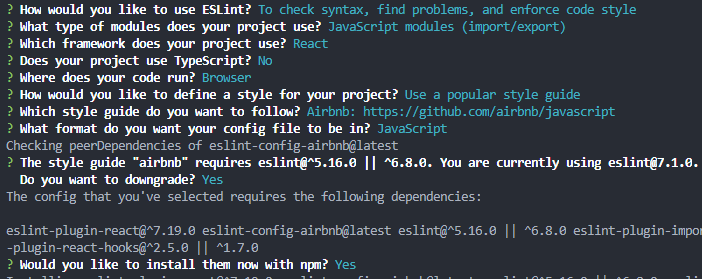
初始化配置后我们就可以使用了,这里我安装的是 airbnb 标准。

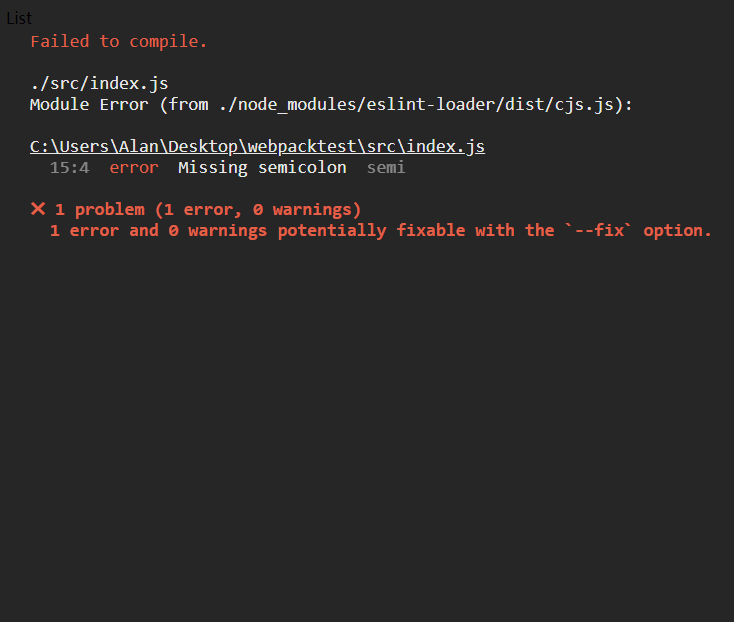
上面图片��中 eslint 提示 jsx 语法不能在 js 文件中使用,这。。。。😰。那我就是要使用怎么办,可以在生成的.eslintrc.js文件中配置 rules 忽略这一标准。
rules: {
	'react/jsx-filename-extension': 0,
},
由于团队协作很难确保每个人的开发环境都是一样的,于是我们可以把 eslint 和 webpack 结合起来,使用一个 loader 在每次打包时对代码进行 eslint 检查,但是这样可能会影响打包速度,使用时要对速度和代码质量进行取舍。这里介绍一下使用到的 eslint-loader
npm i eslint-loader -D
webpack.common.js 配置
rules: [
    {
        test: /\.js$/,
        exclude: /node_modules/, // 不对node_modules下的js文件处理
        use: ['babel-loader', 'eslint-loader'],
    },
],
当然也可以设置devServer.overlay: true来实现错误实时显示在浏览器上,方便调试。
多页应用打包
需要设置多个 entry,打包后生成多个.html 文件。
src
 ├── index.html
 ├── index.js
 └── list.js
// webpack的entry和plugins的配置
entry: {
    main: './src/index.js', // 打包入口文件
    list: './src/list.js',
},
plugins: [
    new HtmlWebpackPlugin({
      template: './src/index.html',
      filename: 'index.html',
      chunks: ['main'],
    }),
    new HtmlWebpackPlugin({
      template: './src/index.html',
      filename: 'list.html',
      chunks: ['list'],
    }),
    new CleanWebpackPlugin(),
],
打包后生成的目录
dist
 ├── index.html
 ├── list.8c4e5ed5eb6302c4c5ef.js
 ├── list.8c4e5ed5eb6302c4c5ef.js.map
 ├── list.html
 ├── main.acc2939e4489e5d76660.js
 ├── main.acc2939e4489e5d76660.js.map
 ├── vendors~list~main.2d42972bf2bf50e6d3cd.js
 └── vendors~list~main.2d42972bf2bf50e6d3cd.js.map
现在只有两个页面还好说,但是当页面一多我们就要配置多个 HtmlWebpackPlugin。那如何让它自动配置呢,这里封装一个函数处理一下就好了
const generateHtmlPlugin = entry => {
  const plugins = [
    new CleanWebpackPlugin(),
    new webpack.ProvidePlugin({
      _: 'lodash'
    })
  ];

  Object.keys(entry).forEach(item => {
    plugins.push(
      new HtmlWebpackPlugin({
        template: './src/index.html',
        filename: `${item}.html`,
        chunks: [item]
      })
    );
  });
  return plugins;
};
webpack 完整配置(webpack.common.js)
const path = require('path');
const HtmlWebpackPlugin = require('html-webpack-plugin');
const { CleanWebpackPlugin } = require('clean-webpack-plugin');
const webpack = require('webpack');

const generateHtmlPlugin = entry => {
  const plugins = [
    new CleanWebpackPlugin(),
    new webpack.ProvidePlugin({
      _: 'lodash'
    })
  ];

  Object.keys(entry).forEach(item => {
    plugins.push(
      new HtmlWebpackPlugin({
        template: './src/index.html',
        filename: `${item}.html`,
        chunks: [item]
      })
    );
  });
  return plugins;
};

const configs = {
  mode: 'development', // 默认为production
  entry: {
    main: './src/index.js', // 打包入口文件
    list: './src/list.js'
  },
  module: {
    rules: [
      {
        test: /\.js$/,
        exclude: /node_modules/, // 不对node_modules下的js文件处理
        use: ['babel-loader']
      }
    ]
  },
  optimization: {
    usedExports: true,
    splitChunks: {
      chunks: 'all'
    }
  },
  output: {
    path: path.resolve(__dirname, 'dist')
  }
};

configs.plugins = generateHtmlPlugin(configs.entry);

module.exports = configs;
webpack 性能优化
Loader
- 减少使用不必要的 Loader
- 合理使用 exclude 和 include 来针对性的使用 loader
Plugin
- 减少不必要的 plugin 的使用
Resolve(偷懒用的?😂)
- 减少 extensions 的使用
- 减少 mainFiles 的使用
- 减少 alias 的使用
extensions 的使用
配置了 extensions 后可以不写扩展名 🤣
目录文件
webpacktest
 ├── package.json
 ├── src
 │   ├── index.html
 │   ├── index.js
 │   └── tool
 │       └── tool.jsx
 ├── webpack.common.js
 ├── webpack.dev.js
 └── webpack.prod.js
resolve: {
    extensions: ['.js', '.jsx'],
},
import tool from './tool/tool';

tool();
export default function Tool() {
  console.log('my tool');
}
设置了extensions后,webpack 由于找不到./tool/tool会先去寻找./tool/tool.js,如果没找到再去寻找./tool/tool.jsx。
mainFiles 的使用
配置了 mainFiles 后可以不写默认文件(说白了就是偷懒 😎)
修改 index.js 文件
import tool from './tool/';

tool();
webpack 配置
resolve: {
    extensions: ['.js', '.jsx'],
    mainFiles: ['index', 'tool'],
},
设置了mainFiles后,webpack 会先去寻找./tool/index.js和./tool/index.jsx ,如果没找到再去寻找./tool/tool.js和./tool/tool.jsx。
alias 的使用
偷懒神器,免去写长长的路径。
修改 index.js 文件
import tool from 'myTool'; //这里使用的是别名alias

tool();
webpack 配置
resolve: {
    extensions: ['.js', '.jsx'],
    mainFiles: ['index', 'tool'],
    alias: {
        myTool: path.resolve(__dirname, './src/tool/tool.jsx'),
    },
},
这样就可以使用别名 myTool 来直接引用 tool.jsx 文件了。
DllPlugin
优化项目中第三方模块的打包速度
多进程打包
多进程打包插件有:thread-loader,parallel-webpack,happypack
sourceMap
根据不同环境来配置不同的 sourceMap 最大程度上优化打包速度
status.json
通过 status.json 文件来分析打包过程,找到最影响性能的地方对症下药。