react 引导组件
Guide 新手引导组件
https://mp.weixin.qq.com/s/vrDQEGgOSnKBvHuwZV6vSA
本文章只介绍大致思路,一些细节的实现请查看Guide 源码
功能需求
- 以
popover的形式附着在目标元素上,以达到解释目标元素效果。 - 存在多个目标元素时,提供上一步/下一步/��结束三个按钮。
- 当元素超出可视区域时,自动滚动到目标元素的位置。
- 屏幕大小变化时,
popover能始终附着在目标元素上
确认 api
确认了功能需求后,就需要来设计 api 了,由于我的组件功能还算比较单一,所以 api 设计的也比较简单。
// 是否显示遮罩层
mask?: boolean;
steps: StepItem;
onClose?: (finished: boolean) => void;
这 3 个 api 都比较好理解,主要讲以下steps。
因为popover需要附着在目标元素上,所以要获取目标元素的位置,可以使用document.querySelector()来实现,那么可以明确steps中需要提供一个selector参数。
于是我们基本可以确认好StepItem的内容。
/**
 * 目标元素选择器
 */
selector: string;
/**
 * popover内容
 */
content: ReactNode;
前置知识
-
React.createPortal
-
HTMLElement.offsetParent 返回一个指向最近的(指包含层级上的最近)包含该元素的定位元素或者最近的 table,td,th,body 元素。当元素的 style.display 设置为 "none" 时,offsetParent 返回 null。
-
HTMLElement.offsetXXX 相对于 offsetParent
-
Element.getBoundingClientRect() 返回元素大小(包括 border+padding)以及相对视口的位置
https://developer.mozilla.org/zh-CN/docs/Web/API/HTMLElement/offsetWidth
-
clientWeight/clientHeight
https://developer.mozilla.org/zh-CN/docs/Web/API/Element/clientWidth
我写的相关 api 例子以便理解
开始编码
项目中使用了rough-notation这个库,主要为了实现一些手绘效果以及动画,我会将相关代码剔除,以免影响主线思路。
首先使用两个变量currentIndex和currentContent来控制当前的step
useEffect(() => {
  handleStepChange();
}, [currentIndex]);
分析一下handleStepChange要实现什么
- 通过
props.steps[currentIndex].selector获取当前的目标元素并获取其offsetParent(后面称为 parent) - 使用
React.createPortal将popover渲染到 parent 节点中 - 由于
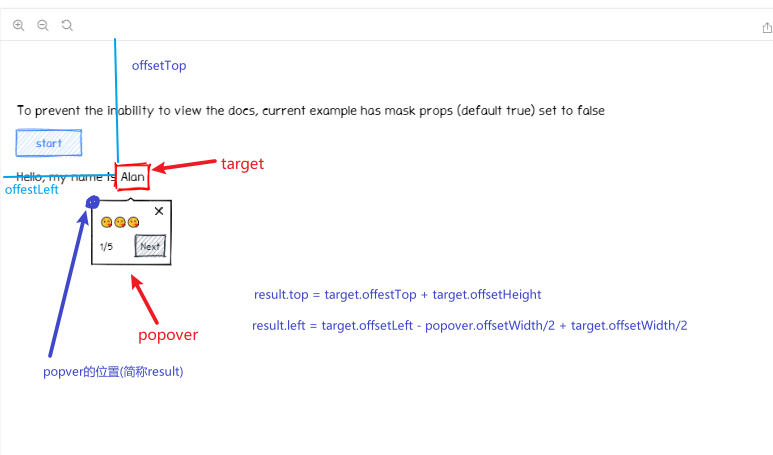
popover现在的父节点已经是目标元素的父节点(即与目标节点互为兄弟节点),所以只需要再相对于 parent 进行绝对定位调整位置即可。 - 判断目标元素是否在可视区域内,没有的话就滚动到目标元素的位置
const handleStepChange = () => {
  const { selector, content } = steps[currentIndex];
  const e = document.querySelector(selector) as HTMLElement;
  const parent = (e.offsetParent || document.body) as HTMLElement;
  setParentEl(parent);

  // 判断是否在可是区域内
  const isVisible = isElementVisible(selector);
  if (!isVisible) {
    e.scrollIntoView({ behavior: 'smooth', block: 'center' });
  }

  // 计算popover相对于parent的偏移量
  computePopoverStyles();
  setCurrentContent(content);
};

// <PopoverContent />为popover内容,理解成一个div就行,只是加了一点样式而已
{createPortal(<PopoverContent />, parentEl)}
popover 内容
<div className={`${cls}-inner`}>
  <div className={`${cls}-content`}>{currentContent}</div>
  <div className={`${cls}-footer`}>
    <span>
      {currentIndex + 1}/{steps.length}
    </span>

    {currentIndex !== 0 && (
      <Button type="standard" size="small" onClick={() => setCurrentIndex(currentIndex - 1)}>
        Prev
      </Button>
    )}

    {currentIndex !== steps.length - 1 && (
      <Button type="standard" size="small" onClick={() => setCurrentIndex(currentIndex + 1)}>
        Next
      </Button>
    )}
    {currentIndex === steps.length - 1 && (
      <Button size="small" onClick={handleClose}>
        finish
      </Button>
    )}
  </div>
</div>
监听窗口变化
这里的computePopoverStyles主要就是计算相对于 parent 的绝对定位偏移量。
// 使用防抖,优化手段
const { run: handleResize } = useDebounceFn(computePopoverStyles, {
  wait: 200
});

useEffect(() => {
  window.addEventListener('resize', handleResize);

  return () => {
    window.removeEventListener('resize', handleResize);
  };
}, []);
计算偏移量
